Friday, March 8, 2013

Creamy Shrimp Curry with Peas

Full disclosure: this is an adapted (tweaked to perfection lol) recipe from my good good good friend the Heater.  She served it to me one time and I was immediately hooked. I'm sure I ate way more than my share. Now. I love a good curry. Thai, Indian, it doesn't matter. In fact, I have an awesome tongue-blistering recipe for leftover Thanksgiving turkey curry that is pretty legit. But this?

This particular curry?

It is reallllly something special. Try it. I swear you will not be disappointed.

Ingredients:
2 T. Canola oil
3 cloves garlic, minced, grated, or pressed
1/2 tsp. cayenne pepper (or more if you like your curry non-pathetic.)
1 tsp. white sugar
1 1/2 tsp. sea (or kosher) salt
1/2 tsp. garam masala (you must use this spice for this recipe, curry powder is NOT the same thing.)
2 T. cilantro, chopped finely (or to taste, since it's straight potent.)
2 medium tomatoes, chopped (not Romas.)
1/4 c. slivered or sliced almonds
3/4 c. heavy whipping cream
1 lb. medium/large raw shrimps, preferably the shell yourself kind (fresher, even though shelling is gross... those tiny legs..... UGH. For vegetarian, sub tofu using the method found here)
1 1/2 C. frozen green peas
About 6-8 cups basmati rice rice for serving (depending on how saucy you like your wenches. Er. Rice.)

Gettin ready.

Go ahead and get the most terrible part of the recipe out the way: shell dem scrimps and rinse them. Maybe you'll be lucky enough to have someone else around to do it...

Terrible, terrible little legs...

Okay worst is past us now. Heat oil in a skillet on medium until shimmering and add your garlic. When the garlic is tender, add all the spices (cayenne, garam masala, sugar, salt) and let the oil warm 'em a bit (masala tends to foam, just stir it). This step is super important cuz it releases the spices' potential.

Watch that garlic doesn't burn.

Start the basmati- preferably in a rice cooker, but if you don't own one then make on stovetop, following package instructions. Rice cooker is the best way tho, cause then if it gets done before the sauce you can just keep it on the "warm" setting ;)


Like clouds of deliciousness...

When your spices are nice and toasty and your kitchen is smelling delightfully spicy, add the tomatoes and cook for a few minutes until kinda broken down. Be sure to scrape any brown bits up and around.
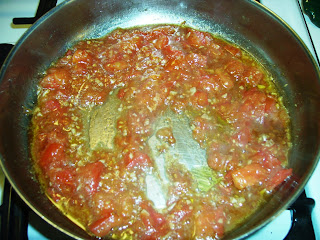
I think we're broken.

While your tomatoes are busy breaking down, go ahead and toast your almonds in a dry pan over medium heat, stirring constantly. They go from raw to burnt in about 2.2 seconds so keep an eye on them lol. As you can see, I barely got to mine in time:

Too much! lol.

Tomatoes should be cooked into submission, so scrape pan again (if needed) and add the cream and the peas. Reduce heat to medium-low and simmer just long enough to make sure peas won't be raw, stirring every so often. Once lightly simmering, add shrimp, bring heat back up to medium and put the lid on the pan. Let simmer for 5-8 minutes, stirring occasionally (to expose dem scrimp to the heat evenly). As soon as shrimp turn pink/orange (not gray) they're done, don't cook longer than that- they get ever so tough. Gross.

OMG.

Immediately take off heat and stir in the cilantro. Serve over basmati, with the almonds sprinkled on top. I also had toasted naan brushed with melted BUTTA. Was the perfect accompaniment to an already perfect dish :)


Double perfection, aw yiss.

Friday, March 1, 2013

Eggplant Parm I'd Shank Someone Over.

So. The problem I have with eggplant parm any time I order it at a restaurant (save maybe once or twice in my life) is that it is slimy. Or bitter. Or slimy and bitter-with the added bonus of  leather-like skin you must chew relentlessly, like so much cud. There is no excuse for that! This recipe, while a little bit of work, will prove that eggplant is a most worthy creature. It will also make you wanna flip chicken parm the bird (ha ha) and never look back. Eggplant is a member of the nightshade family, as are tomatoes. It kinda makes you wonder how they figured out which plant was damn tasty, and which led to a sudden painful death. Trial and error, I guess haaa. ALSO: eggplant contains nicotine, and to paraphrase Jay Leno: "You don't see people out eating eggplant in the rain!" Well who knows. These are so addicting, you might have the urge to do just exactly that.

Ingredients-(Eggplant Parmesan part):
1 medium/large eggplant (with nice looking, not-too-beat-up skin)
2 c. all-purpose flour (might need more or less)
2 c. Italian seasoned breadcrumbs (or season your own- also might need more or less part 2)
1 T. Parmesan or Romano cheese in the shaker (adheres to eggplant tighter than real grated parm)
few good shakes black pepper
6 eggs, beaten
at least 1/4 cup salt (might need more or less part 3 lol)
Extra virgin olive oil for fryin up
Shredded mozzarella to top the plants- maybe 8-12 oz.


Lookit that gorgeous eggplant!

Ingredients- (The accompanying pasta part):
13 oz. pkg whole-wheat thin spaghetti (or whole-wheat angel hair)
8 oz. sliced white/button mushrooms (or more if you like! or even other veggies! peppers, spinach, tomatoes, zucchini, etc.)
1 jar of your fave pasta sauce (I looooove Classico vodka sauce, or you ambitious foolios can make your own :p)

Simple and delicious.

First thangs first-- let's get rid of some of the slimy-inducing moisture, as well as the bitterness of the eggplants. Slice yo plants bout 1/4-1/2 in. thick and spread out on a rack (positioned over paper towels).

Salt, salt, salt, senora...

Salt the everliving daylights outta both sides of the plant, and massage in a bit. Don't worry, this salting will not make your finished product too salty. :) Wait about 30 minutes (perfect time for another beer :D) or even longer until the guys look like this:

Like they were on the treadmill.

You see it? Dat eggplant sweat means delicious results in the end. Go ahead and rinse the slices well, but no need to dry off.
 Assemble your dipping station: flour, egg, and the breadcrumb/Parm/black pepper mixture:


Heat a few T. olive oil in a skillet (I've found that non-stick doesn't brown them as well, fwiw) and start a-dippin. Dredge in flour first:


Then egg and crumbs:


And  fry in batches (might need to add little more oil every batch) over medium high, pressing down on the plants with a spatula every so often to rid 'em of even moar moisture til they resemble this:

Lookin good, guys.

Once done, place them on paper towels (much like bacon) to wick the oil away.  When you are close to frying up your last batch, start sauteing the mushrooms (and other veggies, if using) in a non-stick skillet until golden brown, as always.

Always golden brown. Always.

As soon as the plants are drained of oil and kinda cooled, arrange like so on baking sheet, topping each disk with a small pile of mozzarella:

Try to keep cheese off the pan, hard to clean UGH

Pop into oven at 350 for bout 20-30 mins. or until cheese is as golden and crispy as you like it :) Meanwhile, cook noodles per package instructions and drain, keep reasonably warm. Add the vodka (or fancier) sauce to your mushrooms, simmering on low til the plants are ready to come out of the oven.

I also enjoy this sauce with spicy Italian sausage. Shhh...

After the eggplant is out of the oven, assemble your plate as follows: pasta down first, then sauce, then the eggplant on top. This keeps the eggplant at its crispiest. However, if you wanna ladle sauce over the whole damn lot, be my guest. :)


Bam. Money shot.

See?!?! Sooooo addictive. NOM.

Tuesday, February 19, 2013

Black Bean and Tofu Enchiladas

Tofu gets a bad rap. Sure it is flavorless. Sure it smells like chalk when you're cooking it. Sure you end up spilling that nasty water all over your hands while trying to stab open the tub. Butttt... Done right, and I would trade a steak for it. It is awesome at soaking up flavor, and the chewy cubes are a delicious substitute for meat.

First things first. Crack yo' self open a cold one:

Don't mind if I do.
Anndd press your tofu:


Out, out, damn water!

Two plates, paper towels, and something heavy. Enjoy your drank while you wait for it to lose some moisture (30 minutes or longer). Pressing tofu ensures that it will crisp up and not pop and scald you while it is frying. Ouch.

Ingredients:
1 block extra firm tofu (or cubed chicken if carnivore version)
3-4 nice looking Roma tomatoes
1 4 oz. can fire roasted green chiles (I really recommend fire roasted, more flavors)
1 15 oz. can black beans, drained and rinsed well (EWW bean water part 2)
1 packet taco seasoning (I love Old El Paso, or chili powder, onion powder, garlic and cumin to taste)
1 large can red enchilada sauce (sorry forgot how many oz.)
12 medium flour tortillas (I used white this time, wheat also good, or corn for GF)
shredded sharp or extra sharp cheddar for the top (how much is up to you)
pickled jalapeno slices (don't be a wimp, these are legit delicious addition)
enough olive oil to saute the tofu

Hide and seek tofu!
Blurry sorry :(


Beer's done, and now so is the tofu. Cube it into roughly the size of the black beans (or a lil bigger) and saute in a nonstick skillet on medium high until they are tiny brown cubes of love.

Not so tasteless now, are we?

Roughly chop your Romas:

Seeds and all.

And add them and the chiles and let it all sweat out a bit. Then add your black beans, 8 oz water, and the taco seasoning; continue to simmer on medium high until thickened into a nice gooey filling. Remove from heat.


Ladle a couple spoonfuls of the enchilada sauce on the bottom of a 9x13 dish and create your assembling station:

Left to right.

Scoop filling, roll tight, and place seam side down into the pan, squishing them together as you go until all them babies are in there.

Snuggled.
Pour rest of enchilada sauce over the top and spread to coat evenly.

The sauce keeps the outer edges soft.

Put the jalapenos on first, then layer the cheese over. Shrubs no like the hot stuff so we did a third light cheese, a third extra cheese, and my third SPICYYYY.

Thirds.

Pop in oven at 380 for 35-40 or until sauce on top has thickened and cheese golden.

Actually I'll take the whole pan, thanks.

Get out accoutrements if you like: sour cream or crema, lettuce, tomato, black olives, avocado, etc.

My favorite sour cream, if you can find it.


Annnnnnnnnd BAM.

Eff.

Holy crap, I can't even tell you how good these puppies are. They couldn't get in my mouth fast enough. And they are even better as leftovers, if you can believe that.

But the very best part? They are Shrubs approved :)

Happy Shrubs!


Saturday, February 9, 2013

Side Quests: Easy (and effin delish) Garlic Bread


As promised, here is the recipe for my easy garlic bread. I make two other fancier, more work-intensive varieties- but those are posts for another time ;) This bread will kick any Italian meal up a notch- heck will kick it up for any other meal where bread is required!! My advice is to purchase a nice fresh good quality loaf of bread, it makes a difference. If you have a bakery, or shop at a grocery store that has a bakery, great. Otherwise I bet Panera loaves would be a good choice.

Simple cast.

Ingredients:
1 loaf French or Italian bread, split lengthwise and cut into  four pieces
garlic salt- to taste
Italian seasoning-to taste
crushed red pepper- to taste (I like my bread to be of the lip numbing sort yeehaww!)
grated Parmesan- about 1 T. per piece of bread
1 stick of butter, softened

Place bread on cookie sheet and spread each piece  with 1/4 stick of the butter. Sprinkle garlic salt next, followed by the Italian seasoning, red pepper, and finally the Parm. Now- take your knife and blend the spices and Parm into the butter on top of the bread until it looks homogenous. This is the trick to get the cheese nice and nuttily toasted, and the spices distributed evenly. No one likes an overly salty bite, yuck.

Forgive my ugly cookie sheet lol.

Pop into the oven set to broil until as brown as desired. Certain members of the fam like theirs blackened but I prefer mine more like so:

Get in my mouth!

This is simple but soooo delicious. The cheese toasts up, and the innards of the bread get soaked with delicious butter then they crisp as well. The red pepper is realllly the secret oomph it needs. Gosh. Could gnaw on those crunchy edges every damn day. And (shhh) sometimes I skip the pasta and just spread my spaghetti sauce right on the bread. Like a fat kid. Enjoy!

Thursday, February 7, 2013

Fake (veggie) Lasagna

Lord knows, lasagna is wayyyy too much work. I greatly prefer this recipe both for its ease AND for the umami punch that real lasagna is missing. It can also be adapted for carnivores, by subbing the veggies with ground beef.

Oh, and now let me get on my pedestal about ground beef.
Ahem.
I highly recommend you do not waste your money on packaged ground beef from the store.
No.
Just.... just... don't. It is cheap and fatty and tastes like crap, and you usually have to skim copious amounts of grease off. Packaged ground beef is akin to dog food, in my opinion. Gross.
No.
What you need to do is grab a package of round or sirloin steak from the meat case and have your butcher grind it. Even if you shop at a chain grocery store like I do (i.e. not a fancy butcher shop), they can/will grind it for you. The price works out to just about almossst the same amount per pound, and you'll be able to tell the difference when frying up-no disgusting odor while cooking; and no disgusting skimming off of cheap/rank smelling fat! Also, you see exactly what is going into your "ground beef". No assholes and snouts on your watch! All of those reasons plus hey- your Hamburger Helper tastes of sirloin. Not bad. :p

Okay, rant over. Our lineup will be in layers this time:

First layer-the sauce/topping

Ingredients (Topping):
1/4-1/2 tsp. garlic powder
1 tsp. salt
1 tsp. sugar
2 tsp. Italian seasoning blend
couple good shakes black pepper
2 8 oz. cans low sodium/no sodium tomato sauce, plus one of the empty cans worth of water
2 T. tomato paste
16 oz. button/bella mushrooms-sliced (sub ground beef for vegetables if making carnivore version)
1 small/medium zucchini-sliced into half moons or quarters
Enough olive oil to saute veggies

Extra virgin, please :p

Heat oil til shimmery and add mushrooms. Saute on medium high till brown, then add zucchini.

I changed my mind and quartered them later.

Sprinkle with Italian seasoning and garlic, cook til zucchini just starts to break down.

Gettin there!

 Add tomato sauce/can of water, tomato paste, sugar, salt, and pepper. Turn heat down and simmer for 15-20 minutes. Meanwhile, start second layer.

Ingredients: (Second layer)
8 oz. softened cream cheese (full fat please)
8-10 oz. sour cream (full fat please)
2 T. fresh or dried parsley
1-2 T. fresh basil, chopped or chiffonaded (that green blobby is frozen basil, I do not recommend it)
2 T. GRATED onion

Good lord frozen basil was a bust.

 Mix all the ingredients til smooth, set aside.

Grated onion ensures  no superstrong onion flavor.

Start third layer-16 oz rainbow rotini cooked al dente. When done rinse in a colander/strainer til water runs cool and layer in the bottom of a 9x13 casserole like so:

Gorgeous!

Your mush/zucchini topping should be thickened by now, remove from heat and start assemblage! Spread the cheese mixture (second layer) over the pasta and the mush/zucchini topping over the cheese mixture:

Second!


Third!

Lastly, grate 12 oz. of sharp or extra sharp cheddar and sprinkle over the very tiptop:

Extra sharp is the way to go ;)

 Bake at 375 for 35-40 minutes or until the cheese is brown and bubbly.

Delicious burnt cheese...

As you can see, I like mine VERY brown and bubbly ;) This is comfort food at its finest. The salty umami tomato sauce, the two different cheeses-mild and sharp, the chewy earthy tasting tri color rotini, the pleasant give of well-cooked zucchini in your teeth.... Ugh. Heaven.

The next post will be a recipe for the easy garlic bread I made to accompany this meal. Here- enjoy a preview ;)

Food porn!